Tag Archives: Quinoa

Quinoa Cookies

Standard

I love when desserts are deceptively healthy.

Deceptively healthy?

I’m sure you’re asking yourself if you just read that right. The answer is: you did. Trust me, I love my desserts. If you put a bowl of ice cream in front of me, I’ll make it disappear in a matter of minutes. Chocolate cake? I’ll scarf it down. Cheesecake? Check. Pie? Gone. Brownies? Finished within seconds.

But I don’t necessarily always love how these desserts make me feel after eating them. I hate the feeling of being in a “sugar coma” for hours after indulging in a treat, so I’ve started making little swaps here and there to add a little nutrition to my sweets. I’ve made chocolate cake that’s entirely healthy, soft-serve ice cream by blending a banana in a food processor, made mousse using tofu,  and exchanged apple sauce for sugar in a bunch of recipes that I’ve sampled.  There’s nothing better than digging your spoon into a chocolate concoction that resembles a lava cake and knowing that you’re treating your body right by doing so.

That being said, I believe that everything can be enjoyed in moderation, so I’m not giving up old-fashioned butter ‘n powdered sugar frosting anytime soon!

Today I’m sharing with you a recipe that comes from the creative culinary endeavors of my friend Andrea who you might remember meeting a couple weeks ago in her guest post (she’s also starred on this blog in several other baking posts if that gives you any indication of her talents in the kitchen). I got a text from her today asking me if I wanted to attempt helping her create some sort of quinoa cookie. Of course, I said yes.

She got to work baking as we made dinner, quickly throwing together banana, chocolate, quinoa, and almond meal to whip up an irresistible batter. The ingredients mingled as we dined and then Andrea put the finishing touches on the mix after dinner. This is the recipe she came up with, and it’s outrageously delicious. Also, these cookies are so healthy they could almost be considered a superfood. Your mind and body can feel good about eating this treat!

In honor of the 100th anniversary of the Titanic, the fact that Andrea loves Leo and the Titanic movie, and the fact that it’s hard for me to get these cookies out of my hands, I’m naming them “Never Let Go Quinoa Cookies”.

Never Let Go Quinoa Cookies

Ingredients

1/2 cup uncooked quinoa

1 banana

1/8 cup apple sauce

3/4 bar of chocolate

1/4 cup + heaping 1/3 cup almond meal

1 teaspoon cinnamon

2 teaspoons vanilla

1 teaspoon baking soda

1 teaspoon baking powder (+water)

A pinch of salt

How To

1. Cook the quinoa according to package directions. Transfer cooked quinoa to a bowl and let it cool while you assemble the other ingredients.

2. Mash a banana very well in a medium mixing bowl. Add apple sauce, and quinoa. Preheat oven to 350.

3. Break chocolate into small chunks using a knife. Mix into mixture above. The chocolate should melt upon contacting warm quinoa, but if it doesn’t, pop the mixture into the microwave for a few seconds to melt the chocolate into the other ingredients.

4. Add almond meal, cinnamon, vanilla, and salt. Stir well.

5. In a small bowl or measuring cup, mix 1 teaspoon baking powder with a little bit of water and let the mixture fizz. Then add baking powder mixture and baking soda to the batter. Stir well.

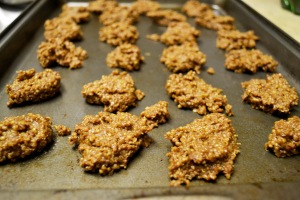
6. Grease a cookie sheet and scoop batter onto the cookie sheet using a small spoon. Put the cookies into the oven for 20 minutes at 350 degrees, checking them to make sure they don’t burn. If you’d like a crispy exterior to your cookie, let the cookies broil on high for 1-4 minutes (depending on the strength of your oven and your desired level of crispiness). Be CAREFUL if you use the broil function on your oven.

7. Once your cookies are baked, take them out of the oven and enjoy a wholesome treat!

These cookies are great for dessert, as a snack, or even as breakfast! They’re packed with healthy ingredients that will fuel your body all day long. Try dunking them in some coconut milk for an extra rich snack packed with healthy fats. Thanks, Andrea for a great recipe!

Quinoa Pizza Crust

Standard

If the plain ole’ title “Quinoa Pizza Crust” doesn’t entice you, maybe this will: Quinoa Pizza Crust Topped Four Ways. And for my roommates, the title was: Quinoa Pizza Crust Topped Four Ways Ready When They Got Home From The Gym. It just gets better and better. To sit around the table with two of my best friends and a piping hot pizza suitable to all of our eating habits was the best. They scarfed down the pizza because they were hungry from their workout and I scarfed it down well, because it was delicious. And I guess I worked up an appetite from cooking for more than three hours. I really need to hire a sous chef or something…

We also need to hire someone to come over to our apartment and eat the following ingredients in vast quantities: peanut butter, quinoa, popcorn, oatmeal, red cabbage, and pasta. See, this whole quinoa pizza crust thing didn’t just pop out of thin air-we are searching for ways to use up the ingredients listed above in creative ways (in other words, we can’t stand to look at the 12 cups of red cabbage just sitting in the fridge, or the boxes of quinoa lined up in the pantry, or eat yet another bowl of pasta with sauce for dinner). Knowing I had excessive amounts of quinoa in the apartment (I think around 5 boxes plus maybe some more) I decided that I’d be brave, start early, and try to tackle this quinoa pizza crust. I found these two recipes online, one from Tasty Eats at Home and one from For Life Personal Chef. I am greatly indebted to these two for helping me find a starting place in learning how to make quinoa pizza crust.

That being said, I did what I usually do and skipped parts of the recipes and added my own flavor to the crusts. The recipe below is one that I’ve tried three times now and it’s come out successfully on each trial run. The crust takes on a really nutty flavor, so much so that in the midst of some bites my roommates and I held up our hands (with pizza still in them, of course) and blurted out (with mouths full, obviously) “This tastes like peanut butter!” The texture of the crust is somewhat like a chewy cracker. I made the crust very thin and in the shape of a rectangle so that I could cut the crust into four flatbread-like creations. Yum. Writing about this makes me wish it were an appropriate time to bust out the food processor and some quinoa and get cookin’!

But then again, who am I kidding? Any time is an appropriate time to make this crust. Here’s the recipe:

Quinoa Pizza Crust

(Makes enough crust to feed two people)

Ingredients

1 cup quinoa

2 tablespoons olive oil

1/2-1 1/2 cups water

2 teaspoons nutritional yeast

1 teaspoon garlic powder

Cooking spray

How To

1. In a medium sized skillet, toast the quinoa over a tablespoon or two of olive oil (just enough oil to coat the bottom of the pan and prevent burning from happening). Toast the quinoa over medium heat until they begin to turn golden brown (probably about seven to ten minutes). You want to make sure that you stir them occasionally to ensure that they aren’t burning.

2. If your oven is extremely slow like mine, you’ll want to preheat it at this point because we’re cranking the heat all the way up to 450 degrees! When you turn the dial to preheat the oven, stick a cookie sheet in there so that it heats with the oven. We’ll use that later to bake the crust.

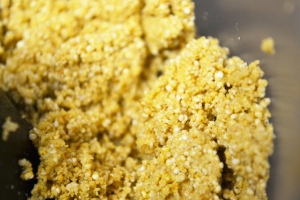
3. While the oven is preheating, pull out a food processor. Pour the toasted quinoa into the processor and blend the quinoa until it reaches an almost flour like consistency (mine was a little more coarse than flour and still worked perfectly so don’t stress if it’s not extremely fine). While you’re doing this, I found it helpful to use a spatula to scrape down the quinoa that got stuck on the sides of the food processor to make sure you get all of the quinoa that you toasted.

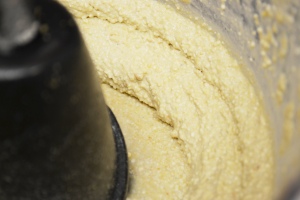
4. After you blend the quinoa, dump half a cup of water into the mixture. At this point you can also add the nutritional yeast and garlic powder. Blend these ingredients together. Open the lid of the processor after blending for a few minutes to check the consistency. The desired consistency of the crust batter will be similar to a cake batter or a thick salad dressing. Essentially, you should be able to pour it but it shouldn’t be runny. At this point, check the batter and you will probably need to add more water. Add water slowly to the batter (mixing between each addition) and continue checking the consistency.

5. Once the batter has reached the perfect consistency, pull the cookie sheet out of the oven and get ready to work fast-this is the hardest part. Spray the cookie sheet with cooking spray and then pour the batter onto the cookie sheet. Have a spatula ready so that you can spread the batter around QUICKLY! Because the cookie sheet is so hot, the batter will start cooking upon contact. Your goal is to have the batter formed into a thin, rectangular crust before the whole thing cooks through. Once you spread the crust onto the cookie sheet, put the crust immediately back into the oven.

6. Cook the crust for 15 minutes on one side and then be prepared for another tricky step: flipping the crust. I pulled the crust out, grabbed two spatulas and flipped the whole crust like one giant omelette. It was difficult but ultimately successful. Another idea for flipping the crust is to use another cookie sheet as a landing pad and just flip the cookie sheet with the crust onto it. I’m open to suggestions on this one!

7. Once you’ve flipped the crust, kick back for about 10-15 minutes and let it finish cooking. Pull it out of the oven once the crust is golden brown and begging to be sampled (go ahead-do it! no one will notice if a corner of the crust is gone…).

8. At this point, congratulations! You’re done making the actual crust!! What’s great about this is that you can either top the crust immediately and pop it back in the oven for a few minutes (at a lower temperature of course) or you can do what I did: leave the crust sitting out for a few hours until dinnertime and then top it then.

Like I said before, I cut this first crust attempt of mine into four flatbread-like creations and topped each of them in a different way.

1. Buttery brown sugar sauce topped with baked sweet potato slivers and walnuts.

2. “Cheese” sauce (nutritional yeast, veg broth, flour, mustard, and garlic) topped with roasted broccoli and garlic.

3. Red-sauce base garnished with sliced mushrooms, caramelized onions and Italian seasoning.

4. Half red-sauce, half “cheese” sauce base topped with a red cabbage, kale, brussels sprouts, onion and red pepper flake mixture.


Soup-er Delicious Recipe!

Standard

As usual, I’m lovin’ the puns. I’m also lovin’ soup right now. As in I-eat-soup-at-least-once-a-day type of lovin’. I’ve never been much of a soup girl, but since visiting Peru and returning from the trip, I’ve really been into soup. Why? I’m not sure-maybe it has something to do with the fact that I go through food phases (hence the outrageous amount of spaghetti squash, then popcorn, then Greek Yogurt, then sweet potatoes that I’ve eaten in the past few months..). So no matter the reason, I’m a big fan of soup right now. And I’ve got some soup stories and recipes up my sleeve that will soup-ersede your expectations.

A story about soup-erstars. Yes, real live superstars. In Peru we went to a small developing village called El Salvador where the people really have to work together as a community in order to survive. This really special lady named Maria Alexandra recognized that the people of the village weren’t getting good meals for themselves and their families so she did something about it. She transformed half of her house into a soup kitchen. She works every single day except for Sundays with a couple of rotating volunteers chopping and peeling and cleaning the food that goes into the soup that is doled out to any villager who pays a couple of soles to get a meal. The work that one person has put into ensuring that the rest of her community is well-fed was incredible to see. It made me evaluate my own life and think about ways that I could help others. What would the world look like if each of us opened half of our homes (literally or metaphorically) to help our neighbors, family, and friends? I have a feeling that there would be a lot more smiles in the world. Every single person that we passed on the street of the village of El Salvador had the hugest smile on their face. It was an incredible place. Now, don’t you agree that they’re soup-erstars?

Fact: the soups in Peru are soup-erior to most. Cream of asparagus, creole soup, quinoa soup, chicken noodle soup, cream of mushroom, potato stew…you name it-they’ve got it. I think my favorite soup was a traditional potato stew or the quinoa soup made for us during our homestay on the island of Amantani on Lake Titicaca. Our sweet homestay host cooked over a fire all day with cast iron pans to make us the potato stew one night and the quinoa soup another. After a long day of learning how to plow potato fields and hiking, I never thought I’d want to come home to a bowl of steaming soup-but it was perfect. Accompanied by a light Italian-esque bread for dipping, I inhaled both bowls of soup in a matter of minutes.

Homemade chicken noodle soup is soup-erb and my grandma passed down her recipe to me. I even learned how to make homemade noodles from a family recipe that has been passed down for four generations. Something else that’s been passed down? A cutting board that my great-great-great grandpa made for my great-great-great grandma that she used to cut noodles on. How special is that? So special that I’m not going to share that recipe with you because I cherish it too much. And half of the recipe is actually standing in the kitchen with my grandma watching her work like a pro with the sensitive dough. Even though the ingredients are simple, the technique is what’s hard to learn. The past few weeks I’ve been feeling sick so she froze chicken noodle soup for me to bring home to my apartment. What could be more comforting than that? Thanks, Mammie!

Alright, since I won’t share the chicken noodle soup recipe, I’ll give you a soup-erpowered, protein-packed, quinoa-filled soup that’ll give you a taste of Peru and an awesome nutritional boost. So, without further ado (and without anymore fun soup puns) I’ll leave you with this quinoa soup recipe. I made it for my mom and grandparents and even though the quinoa looked remarkably similar to my grandpa’s grass seed, the soup was had and enjoyed by all. I hope you love it too.

Quinoa Soup

Ingredients

2 quarts vegetable broth

1 cup quinoa

1 white onion

A handful of carrots

A handful of small, white potatoes (peeled)

Rosemary (to taste)

Mint (to taste)

1 Garlic clove

How-To

1. This recipe is really easy. First, cook the quinoa according to package directions. Then put everything into one pot and let it simmer and warm up for 30-40 minutes. Serve with some bread and enjoy!

(Note: this is my simplified version of the soup and reflects what I tasted in the soup in Peru. There are many varieties out there and this is just my take on it. Nevertheless, I hope you enjoy!)